Temperature and humidity measurements with the AVR web-server
ArticleCategory: [Choose a category, do not translate
this]
Hardware
AuthorImage:[Here we need a little image from you]
![[Photo of the Author]](../../common/images/Guido-S.gif)
TranslationInfo:[Author + translation history. mailto: or
http://homepage]
original in en Guido Socher
AboutTheAuthor:[A small biography about the author]
Guido likes Linux because it is a really good system to
develop your own hardware.
Abstract:[Here you write a little summary]
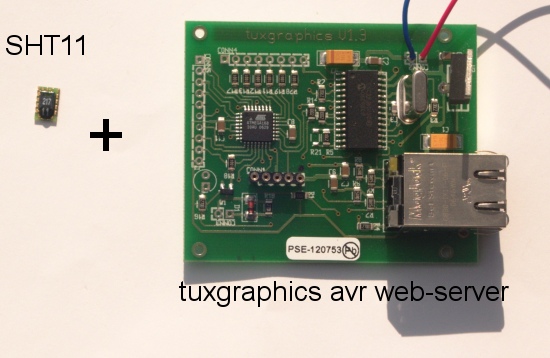
The tuxgraphics AVR web-server has a lot of general purpose
IO pins where external hardware such as sensors can easily be
attached.
In this example we use the sensirion sht11 sensor to
- measure temperature
- measure humidity
- calculate the dew point
All that is done with just one sensor. No other external components
are needed.
ArticleIllustration:[This is the title picture for your
article]
![[Illustration]](../../common/images2/article07091/title_sensirion.jpg)
ArticleBody:[The article body]
The sht11
The sht11 from www.sensirion.com is a fully calibrated sensor. Not a single external component is needed to
use it in combination with an avr microcontroller.
It has:
- a wide supply voltage range (2.5-5.5V)
- 2 sensors for relative humidity and temperature
- Precise dew-point calculation possible
- Measurement range: 0-100% RH
- Absolute relative humidity accuracy: +/- 3% RH
- Temp. accuracy: +/- 0.4°C @ 25 °C
- digital output and fully calibrated sensor.
A datasheet is available in the download section of this article or from www.sensirion.com.
It is a very good quality sensor developed in Switzerland.
A few things are a bit misleading when you read the datasheet
of the sensor and I mention it here to avoid surprises:
- SHT11 has a 2-wire interface and that interface
is not identical to the atmel 2-wire interface (atmel TWI).
Atmel TWI is an I2C conform interface. The sensirion implementation
is not I2C conform. The main difference is in the start condition.
Sensirion does not say why they are not I2C conform. My personal opinion
is that they did that on purpose to avoid license issues with Philips
who developed I2C. The code needed communicate with the sensor is not
larger than code for an atmel TWI state machine. Therefore it does not really matter
that SHT11 is not I2C conform.
-
The sensor provides checksums to ensure integrity of all the measurement data.
The C-code example from Sensirion does not use that feature. I wanted
to use it and it took me some time to get it to work. The problem
was that Sensirion does not use standard CRC8 checksums. They use CRC8 with
the bytes bit-reversed.
- The datasheet talks about several seconds response time
and calls it fast. It would be way too slow for a web-server reading the
data at the time of the http-request. One would have to do the measurement
in the background. Fortunately that seems to be either the response time to
changes in the environment or relate to an older sensor revision.
The sensors that I saw needed all less
than 200ms for the measurements. Pretty fast.
What you need
... and this is what you get:
Humidity and temperature data accessible from any web-browser. You can
even make it available to your mobile phone if you configure your DSL router
appropriately.
What is the dew point?
The dew-point temperature is the temperature to which the air must be cooled to
reach saturation. When the temperature
cools to the dew point, fog or dew can occur.
Example: In your bath room you measure 23'C and 61% humidity. The
resulting dew point is about 15'C. If your window or wall temperature
would be 15'C or less then it would become wet.
Connecting the sensor
The SHT11 humidity and temperature sensor can be connected
the Atmega microcontroller as follows. No additional components are needed.
Nothing must be connected to pin 1 (at the top) and the pins on the right.
Those seem to be used for test and calibration during production.
You need just one more IO-pin per extra sensor in case you want to connect more than one sensor.
The sck line can be shared but each sensor needs its own
data-line as the sensors are all identical and can thus not be connected in a bus
system.
The sensirion_protocol.c available from the download section expects
the sensor to be connected as follows:
| SHT11 | Web-server board |
|---|
| Vcc | 3.3V (available on the analog port) |
| Data | PD1 (available on the digital IO port) |
| SCK | PD0 (available on the digital IO port) |
| GND | GND (available on the digital IO port) |
You can change that as you like. Just edit the definitions at the beginning of
sensirion_protocol.c.
The code to do this
Although the sensor is not I2C conform it is still possible to
integrate it with an AVR microcontroller with less than 1Kb compiled
C-code. All with just very little code: measurement, unit conversion, checksum calculations and dew point calculations.
You can download the needed code in the download section. It is
part of the tar-archive for a AVR-web-server. In the tar-archive
you find 3 files: sensirion_protocol-NOcrc.c sensirion_protocol-crc.c and
sensirion_protocol.h which are responsible for the interface with the SHT11
sensor.
sensirion_protocol-NOcrc.c is slightly smaller and does not do any
CRC8 checksums. sensirion_protocol-crc.c uses CRC8. If you have the sensor
close to the microcontroller (2-50 cm cable) then there will be no need
to secure the data against interference or transmission errors between
sensor and microcontroller. You can then use the file without CRC8 calculations.
One of the two files (sensirion_protocol-NOcrc.c or sensirion_protocol-crc.c)
should be copied to the name sensirion_protocol.c and sensirion_protocol.c is
what will then be compiled by the Makefile.
The actual use of the api provided by sensirion_protocol.h is then very easy:
#include "sensirion_protocol.h"

unsigned int humival_raw,tempval_raw;
unsigned char error;
int temp, dew;
unsigned char rh;

//measure temperature
error=s_measure( &tempval_raw,0);
if (error==0){
    error=s_measure( &humival_raw,1); //measure humidity
}

// measurement was OK (you could use error to detect if there
// is no sensor attached of if there is a CRC data integrity problem.
// We don't do this here to keep the example short).
if (error==0){
    temp=calc_sth11_temp(tempval_raw); // calculate temperature
    rh=rhcalc_int(humival_raw); // calculate relative humidity.
    dew=calc_dewpoint(rh,temp); // calculate dew point temperature
}
//
// That's it. Now you have temperature in Celsius * 10 in temp (e.g 251 for
// 25.1'C), dew-point in dew and relative humidity (values 0-100 %) in rh.
The above example is provided in case you want to use the sensirion code
as part of your own development. If you want to use the sensor together
with the avr web-server from tuxgraphics then nothing needes to be
witten or changed. Just use the tar-archive from the download section
as is and follow the included README.htm file.
My application
There are certainly plenty of applications for this. You can use it anywhere
where you want to measure any or all of the values temperature, dew-point and
humidity.
I just want to tell you what my use of it is. When I go on vacation I do
usually switch off the heating in the house to save cost. The problem with this
can be that it can either become too cold and/or too humid in the house. If
you leave a window open then it might become too cold. If you have the window
closed it can become very tropic (=too humid) due to the flowers in the rooms
and no ventilation.
With this sensor I can monitor the situation and ask the neighbors to open a window for a while if needed.
I can monitor that from my mobile phone or any computer at any time.
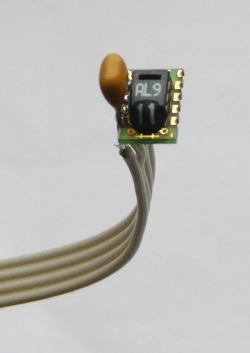
Sht11 with 100nf capacitor
|
Extending the sensor cable length
The length of the cable between microcontroller and SHT11 sensor should not be
more than 50cm to ensure reliable operation. You can however extend it to a few
meters by soldering a 100nF capacitor between the power supply pins of the
sensor.
Automatically updating the web page
Personally I don't like web pages which reload themselves automatically.
Many people have however written to me that they would like to have such a
feature and maybe it makes sense here. As of software version 3.1 the page
updates every 5min. If you want additional updates in-between then you can just
click on the link "refresh page" at the bottom of the page.
There are two technical possibilities to implement automatic refreshing of
a web page:
1) Adding the http-refresh in the server header. The server header is part of
the http protocol and you don't see it if you click on page source in you
web browser. A refresh very 5min would look like this:
HTTP/1.0 200 OK
Content-Type: text/html
Pragma: no-cache
Refresh: 300
The corresponging avr web-server C-code would look like this (one line):
plen=fill_tcp_data_p(buf,0,PSTR("HTTP/1.0 200 OK\r\nContent-Type: text/html
\r\nPragma: no-cache\r\nRefresh: 300\r\n\r\n"));
2) Using Javascript. The advantage here is that the user could stop the re-loading
by switching off Javascript in the browser. The disadvantage is that it
is a lot more html code. 300000 means 5min. You can place this statement
somewhere on the webpage:
<script LANGUAGE=JavaScript>
window.setTimeout("window.location.reload()",300000);
</script>
The corresponging avr web-server C-code would look like this (one line):
plen=fill_tcp_data_p(buf,plen,PSTR("<SCRIPT LANGUAGE=JavaScript>
window.setTimeout(\"window.location.reload()\",300000);</SCRIPT>\n"));
For the change in software version 3.1 I have used solution 1).
References