|
Content:
By Guido Socher <guido_at_tuxgraphics.org> |
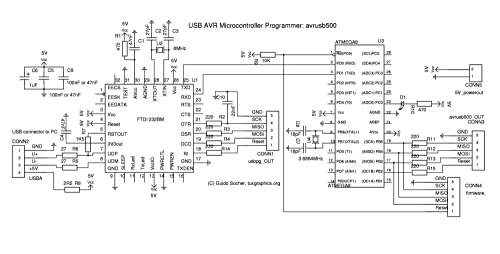
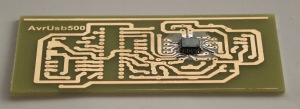
AvrUsb500 -- an open source Atmel AVR Programmer, stk500 V2 compatible, with USB interface![[Illustration]](../../common/images2/article05101/title.jpg)
Abstract:
It took me about 4 month to develop the software and hardware presented
in this article. Especially coding the stk500 specification from scratch
in C was not easy. The result was however worth the effort. I really like
this new programmer and I am sure you will like it too.
|
![[protocols]](../../common/images2/article05101/idea.gif)
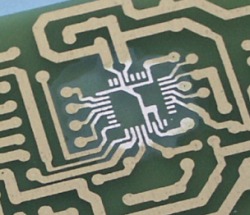 The board should be 100% clean and the pads for the smd chip coated with solder flux. Do not
use flux which contains aggressive chemicals. Such flux is for repairing
a water spout. What you need is e.g known as "no clean flux". It is a
solder flux which will mostly evaporate and any remains can stay on the board.
The board should be 100% clean and the pads for the smd chip coated with solder flux. Do not
use flux which contains aggressive chemicals. Such flux is for repairing
a water spout. What you need is e.g known as "no clean flux". It is a
solder flux which will mostly evaporate and any remains can stay on the board.
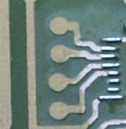 Put tiny amounts of solder with soldering iron onto each pad.
The soldering iron should have a 0.8mm tip (or smaller) and you should
use 0.5mm SMD solder wire.
Put tiny amounts of solder with soldering iron onto each pad.
The soldering iron should have a 0.8mm tip (or smaller) and you should
use 0.5mm SMD solder wire.
 Now go around the chip pin by pin and press each pin gently onto the board.
Don't add solder.
Now go around the chip pin by pin and press each pin gently onto the board.
Don't add solder.
| guido@brain
T: Bus=01 Lev=01 Prnt=01 Port=00 Cnt=01 Dev#= 2 Spd=12 MxCh= 0 D: Ver= 1.10 Cls=00(>ifc ) Sub=00 Prot=00 MxPS= 8 #Cfgs= 1 P: Vendor=0403 ProdID=6001 Rev= 2.00 S: Manufacturer=FTDI S: Product=USB <-> Serial C:* #Ifs= 1 Cfg#= 1 Atr=80 MxPwr= 90mA I: If#= 0 Alt= 0 #EPs= 2 Cls=ff(vend.) Sub=ff Prot=ff Driver=serial E: Ad=81(I) Atr=02(Bulk) MxPS= 64 Ivl=0ms E: Ad=02(O) Atr=02(Bulk) MxPS= 64 Ivl=0ms |
tar zxvf avrusb500-0.6.tar.gz
cd avrusb500-0.6
The avrusb500-X.Y contains two more test programs which test the microcontroller and the whole communication to your PC. Load them also. How to do this is described in the README file inside the avrusb500-X.Y package. You will basically just connect the bridge cable (CONN1 to CONN4) and execute a command like
make load_test_1but please have a look at the readme file (command: more README).
make loadfrom the unpacked avrusb500-X.Y package. That's all.
avrdude -p m8 -c avrusb500 -e -U flash:w:MyCode.hexThe configuration file entry in the avrdude.conf file is:
default_serial     = "/dev/usb/tts/0";
#or
#default_serial     = "/dev/ttyUSB0";

# ... and further down:
programmer
  id    = "avrusb500";
  desc  = "Atmel AVR ISP V2 programmer from tuxgraphics";
  type  =  stk500v2;
;
#
2005-10-28, generated by tuxgrparser version 2.54