home |
electronics |
toolbox |
science club |
tuxtalk |
photos |
e-cards |
online-shop

lcdproc -- LCD displays easy to use and easy to build
![[Illustration]](../../common/images2/article375/title.jpg)
Abstract:
Those readers that might have expected now an article about
microcontrollers should not worry. I will definitely continue.
The next hardware article will again be about microcontrollers.
I have also created a page where you find all recent
electronics articles: www.tuxgraphics.org -> electronics
I hope that this makes it easier to follow and to get an
overview.
Long time linuxfocus readers will still remember my old March 2003: Linux USB LCD
display with watchdog and buttons and A LCD control panel for your
Linux server articles. Those where really "luxury" LCD
panels with hardware watchdog and ADC etc... Over time I have
noticed that all this extra functionality is something that I
do not use so often.
This article presents now the "basic" model: LCD display and 2
buttons; simple and easy to build for everybody.
_________________ _________________ _________________
|
What is lcdproc?
 Lcdproc used to be at the very
beginning a program to display some statistics (cpu load,
uptime, time, ...) on an external LCD display. Over time it has
however evolved into a much more generic solution. Today the
lcdproc package contains LCDd, a generic server and LCD driver,
plus many clients. One of those clients is still the actual
executable called lcdproc which still shows server statistics
however there are also others. This client server architecture
has the big advantage that you do not need to write your client
in a specific language. You just need to use the simple
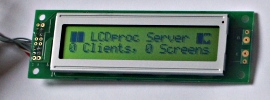
ascii protocol between client and server. Here is an example
which implements a clock in just 36
lines of perl code. It displays time and date and the
upper right corner shows a little icon called "heartbeat". The
"heartbeat" is
added by the LCDd server. This "heartbeat" icon blinks once in a
while to indicate that the display is still alive.
Lcdproc used to be at the very
beginning a program to display some statistics (cpu load,
uptime, time, ...) on an external LCD display. Over time it has
however evolved into a much more generic solution. Today the
lcdproc package contains LCDd, a generic server and LCD driver,
plus many clients. One of those clients is still the actual
executable called lcdproc which still shows server statistics
however there are also others. This client server architecture
has the big advantage that you do not need to write your client
in a specific language. You just need to use the simple
ascii protocol between client and server. Here is an example
which implements a clock in just 36
lines of perl code. It displays time and date and the
upper right corner shows a little icon called "heartbeat". The
"heartbeat" is
added by the LCDd server. This "heartbeat" icon blinks once in a
while to indicate that the display is still alive.
In lcdproc you can have more than just strings. You get
bar-graphs, scrollers, title bars.... and text strings. At the
beginning of the program you define those objects (they are
called widgets) and then you fill them with data. It's
explained in the LCDproc
Developer's Guide from page 7 and on wards.
The main part of the little LCD
clock example program looks like this:
#!/usr/bin/perl -w
....
# initiate the communication:
print $remote "hello\n";
....
# set our name and define a text string widget
print $remote "client_set name lcdtime\n";
print $remote "screen_add scr1\n";
print $remote "widget_add scr1 str1 string\n";
....
while(1)
{
    ....
    $date = scalar localtime;
    # now write to the LCD:
    print $remote "widget_set scr1 str1 1 1 \"$date\"\n";
    sleep 10;
}
Easy enough? OK, then let's build something more useful.
The hardware
The parallel port of a PC works according to specifications
with 5V. If you now take a look at the datasheet of a modern
LCD display (e.g from tuxgraphics: http://shop.tuxgraphics.org/electronic/lcd.html)
you will notice that even though the displays are big they need
extremely little power. Only 2 mA ! With so little current
it must be possible to power the display directly from the
parallel port. The advantage is then that you do not need any
extra power connector. It is just one LCD display with one
connector to the parallel port. Very convenient.
It is possible with a parallel port that really provides 5V.
The problem is that there are some which do not follow the
specifications. So how do you know if your parallel port is
good enough for "self powered" solution? Here is a little test:
- Install lcdproc with the "parallel port power" patch (see
references).
- Configure the /etc/LCDd.conf file as described further
down.
- Start the program LCDd as root.
- Take a digital voltmeter and measure the voltage on pin
1. It should be 4.90V or more (measure between pin 1 and
pin 18 = GND).
- Now connect a 33K resistor to the parallel port between
pin 1 and pin 18. The voltage should go down to 4.25V. If you get
more then your parallel port is very good. If you get less then
the "self powered" solution will not work.
If this test passes then you can go for the "parallel port
power" solution using the tuxgraphics 20x2 display (or equivalent). This is
tested. It will work.
 If your parallel port is
a bit weak then don't worry too much. You can either use the
internal 5V of your PC (you have to open it for this purpose)
or you can get 5V from an free USB connector.
If your parallel port is
a bit weak then don't worry too much. You can either use the
internal 5V of your PC (you have to open it for this purpose)
or you can get 5V from an free USB connector.
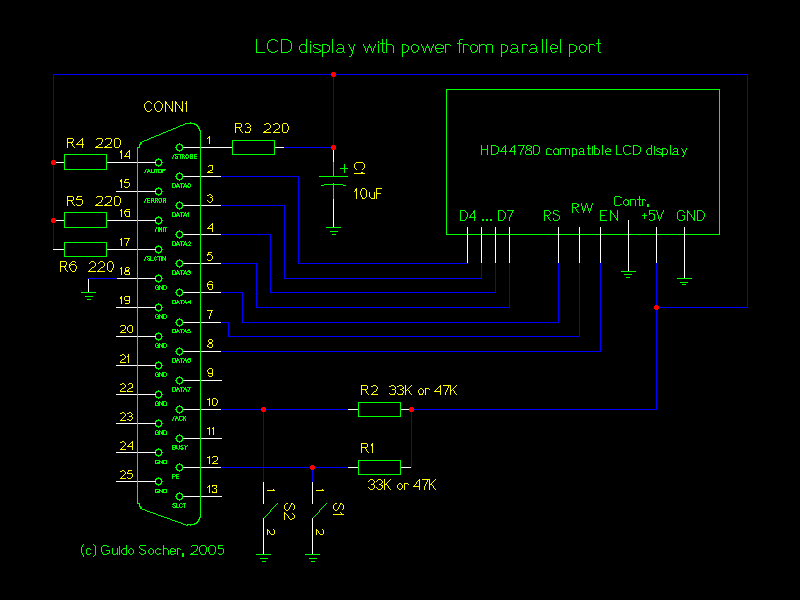
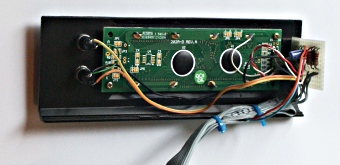
The circuit diagram
The first diagram shows the connections for a LCD display with
2 buttons using the "parallel port power" solution.
Parallel port
pin 1 , strobe  = 220, supply voltage
pin 2 , D0      = LCD pin D4
pin 3 , D1      = LCD pin D5
pin 4 , D2      = LCD pin D6
pin 5 , D3      = LCD pin D7

pin 6 , D4      = LCD pin RS
pin 7 , D5      = LCD pin RW
pin 8 , D6      = LCD pin EN

pin 10, ACK     = button A, upper red button
pin 12, PE      = button C, lower black button

pin 14, strobe  = 220, supply voltage
pin 16, strobe  = 220, supply voltage
pin 17, strobe  = 220, supply voltage

pin 18, ground  = 0V, GND
This second drawing shows the connections for a LCD display
with 2 buttons and external power:
As for all new electronics articles you can again get a kit
with all the components from shop.tuxgraphics.org
I have mounted the lcd display in a black plastic frame:

The lcdproc parallel port power patch
LCDd sends always some data to the display. One could therefore
use some diodes and derive the power from the signal lines. The
problem is that diodes will cause a voltage drop of at least
0.5V even at low currents. We can't afford this. There are
however enough output lines free if you use LCDd with just one
LCD display. Nothing is easier than patching the LCDd software
to always keep those free pins on logical "1". We still insert
some resistors to have a minimum short circuit protection (or
stupid mistake protection ;-). The patch for lcdproc-0.4.5 is
available from the download section. You apply it like this:
tar zxvf lcdproc-0.4.5.tar.gz
cd lcdproc-0.4.5
patch -p 1 < lcdproc-0.4.5-pp-powerpatch-v1.txt
./configure --enable-drivers=hd44780
make

make install
(or you can just copy LCDd.conf /etc and copy server/LCDd to /usr/bin)
The LCDd.conf file
The /etc/LCDd.conf file configures our LCD driver and server
(=the LCDd process). In the /etc/LCDd.conf file you need to
uncomment the following in order to use a HD44780 compatible
display with wiring as described in this article:
[server]
Driver=HD44780

[HD44780]
# Hitachi HD44780 driver

Port=0x3BC
# Port where the LPT is. Usual values are 0x278, 0x378 and 0x3BC

ConnectionType=4bit
Keypad=yes
Backlight=no

Size=20x2
# Specifies the size of the LCD.

DelayMult=4
DelayBus=true
The difficult part is the port address (0x278, 0x378 and
0x3BC). How do you know at which IO address your parallel port
is? The easiest is to load the parport kernel module (modprobe
parport) and then look at /proc/ioports:
modprobe parport
modprobe parport_pc

cat /proc/ioports

...
0388-0389 : OPL2/3 (left)
038a-038b : OPL2/3 (right)
03bc-03be : parport0
03c0-03df : vga+
03f6-03f6 : ide0
...

in this case you use: 0x3bc
Our own application
You have seen at the beginning of this article how easy it is
to send some text strings to the display. It becomes a bit more
complicated if you want an interactive display (with the two
buttons). In this case we need to avoid the sleep statement
otherwise the buttons are not responsive during the sleep
period. At the same time we need a blocking statement which
stops the loop. What we need is the system call "select". It
stops execution until a timeout or until a button is pressed at
the display.
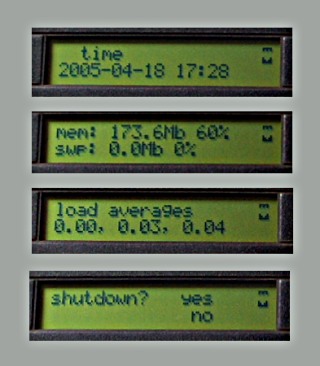
Our application will provide some stats (mem, swap, cpu, time)
and you can use the buttons to shutdown the machine.
The script is called servermenu_pl and you find it in the
download section.
I present here only such a basic application as experience from
previous articles showed that most readers just want to know
how to do something and then they have their own applications
for it. I received emails with all kind of ideas, CD-burning
station, weather station PC, alarm systems, ... all this can be
done. Just modify the code a bit.
It's really cool and a lot of fun to play with this display and
lcdproc.
References
© Guido Socher, tuxgraphics.org
2005-07-30, generated by tuxgrparser version 2.53